
In this article, I’ll guide you on how to book an F1 visa interview from Nepal, so let’s get started!
It’s super easy, and you can do all the steps by yourself! Remember, you need to have your passport, I-20, and make sure you’ve filled out the DS-160 form before scheduling the appointment.
This interview fee is also referred to as the MRV Fee.
The complete form of MRV is “Machine-Readable Visa.” The MRV fee receipt serves as a document that acknowledges the payment of the U.S. visa application fee. It is essential proof of payment required to schedule a visa appointment and proceed with the visa application process.
First, visit the US Travel Portal: https://portal.ustraveldocs.com/ and click on the “New User?” option.
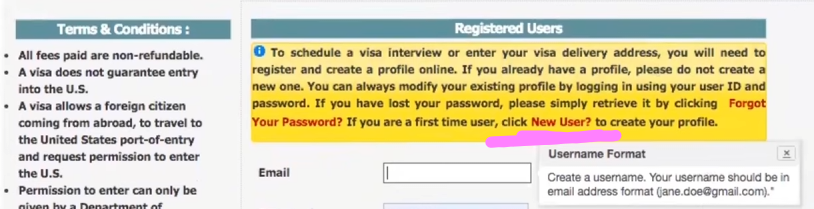
After that, it will ask you to provide new user registration details:
- Select Country for VISA—this is where you want to attend the interview. In our case, it will be Nepal.
- Provide your email, first name, last name, and create a password. Once done, check “I have read” and click Submit.
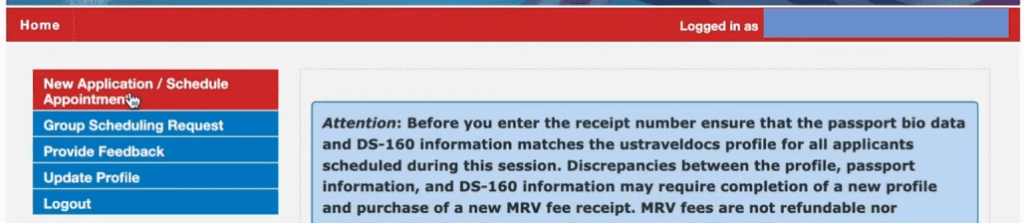
Now that you’re logged in, it’s time to schedule the appointment.
Click on “New Application/Schedule Appointment” in the top left corner.
In Step 1, select “Non-Immigrant Visa.”
It will skip to Step 3—select “Student Visa Applicants.”
Next, select your visa class. For our case, it will be “F-1 – Academic or Language Studies.”
This next section is crucial—you’ll need to provide your details:
- Passport Details: Enter your first name, last name, and your DS-160 Confirmation Number.
- Fill everything out, and in the Mailing Address section, provide your permanent address.
Now, in the Student and Exchange Visitor Program Details, you have to enter your SEVIS Number (found at the top of your I-20), your university name, and your university zip code (the postal code of the city where your university is located).
Once filled, click Continue.
Step 6: This step is important if you have dependents, such as a spouse or children, that you want to bring along. This is usually done by people going for Master’s or Ph.D., but anyone can add dependents. If you have any, click on Add by Name to include them. If not, click Continue to proceed to the next section.
Step 7: You will be asked several questions:
- It will ask you to confirm if you and your dependents (if added) are Nepali. In our case, the answer will be “Yes.”
- If you’ve previously applied for a visa and were rejected, click “Yes,” but since this is our first time, we will select “No.”
- The next question asks if you have already provided biometrics (10 fingerprints) at any US Embassy or Consulate. If you have, select “Yes,” but in our case, we’ll select “No.”
After that, it’s time to select the Passport Pickup Location. This is where your passport will be sent if you are approved and receive the green slip during the interview. Your visa will be issued on the passport, and it will be sent to the pickup location you choose here.
Select the city where you want to receive the passport. If you select a location outside Kathmandu, there will be a charge of around Rs. 600, which you have to pay when collecting your passport. For Kathmandu, there is no charge.
If you select Kathmandu, the system will show the pickup location in Durbar Marg, where the head office of NIMB Bank is located. Select that and click Continue.
Now, you will see a message saying, “Visa fees are not refundable.” Make sure to read through all of it. If there are any issues or if you need to apply again for another interview, you will have to pay the MRV fee again and repeat the process.
There are two ways to pay the fee:
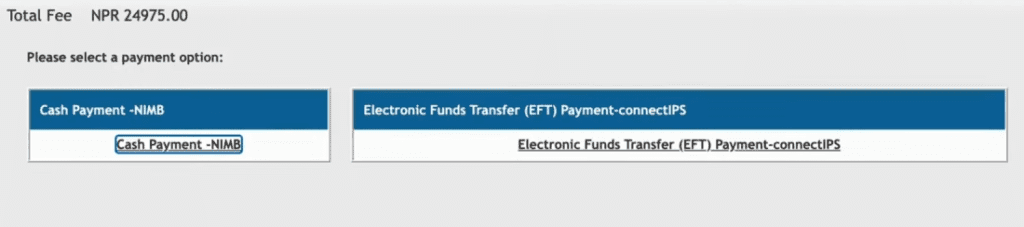
- Cash Payment at NIMB Bank
- ConnectIPS
Amount: $185
You can use either of the options mentioned above. In Nepal, only NIMB Bank provides US Embassy services.
Whichever method you choose, it will generate a receipt-like document where you will find your CGI Reference Number (this is important) and the amount to deposit. If you select ConnectIPS, all the steps will be mentioned clearly, so you can follow them easily.
For this example, let’s go with the bank process.
Note down your CGI Reference Number and visit an NIMB Bank branch. Keep in mind, not all branches provide this service. You can check the list of branches by clicking on “List of NIMB Branches in Nepal for US Embassy Services.“
Take your original citizenship or passport with you and go to your preferred branch. Tell them you’re there to pay the Appointment Fee (MRV Fee), and they will give you a deposit voucher.
In the voucher, fill in your details and include your CGI Reference Number, then hand it over. That’s it! After 1-2 hours, the payment process will be completed.
Now, go back to https://portal.ustraveldocs.com/, log in with the account you created (if you’ve forgotten your password, just click on “Forgot password” to reset it).
Once logged in, click Continue at the bottom left.
It will show the previously completed page, so click Continue again.
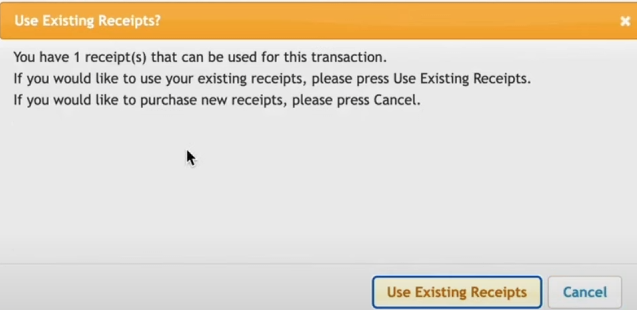
You will see the same message about fees, so click Confirm, and then click on “Use Existing Receipts”, meaning we’ve already paid the fee.
After that, you’ll see a page with your name and receipt number. Click on Continue.
Here, you’ll have to select your Visa Priority.
Make sure to choose the correct option. If you have been refused previously, select “Previously Refused”, but since this is our first time, select “Regular.”
Now, it will show all the available slots, and you can select the dates to book your appointment. You don’t have to book a date immediately—just wait until you’re sure, as you can reschedule your date up to (1+4) times (first booking plus up to 4 times).
Keep checking, and hopefully, you will find a date that suits you!
So, I have booked the date, but I decided to change my university, or I enter a wrong DS-160 confirmation number. Can I change it?
Absolutely! You can do it easily and with peace of mind.
Just go to the portal, log in, and click on “Update Profile” on the top left side.
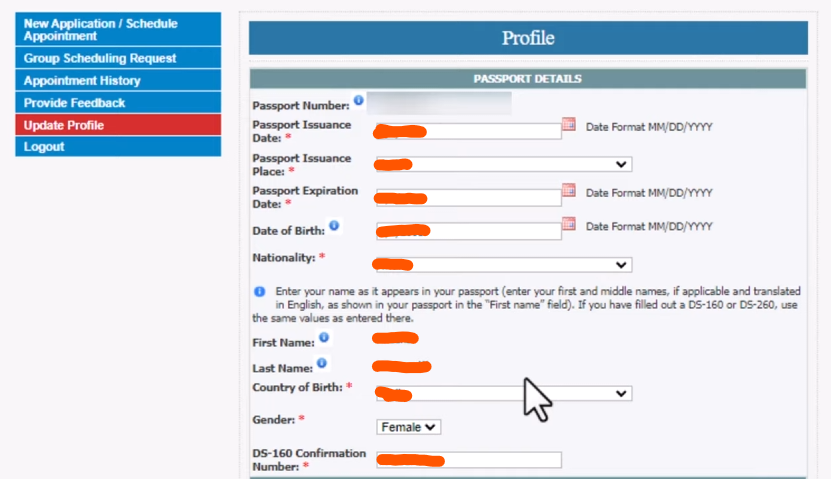
There, you will see all the options where you can change your personal details, SEVIS information, and DS-160 details. Make the necessary changes accordingly.
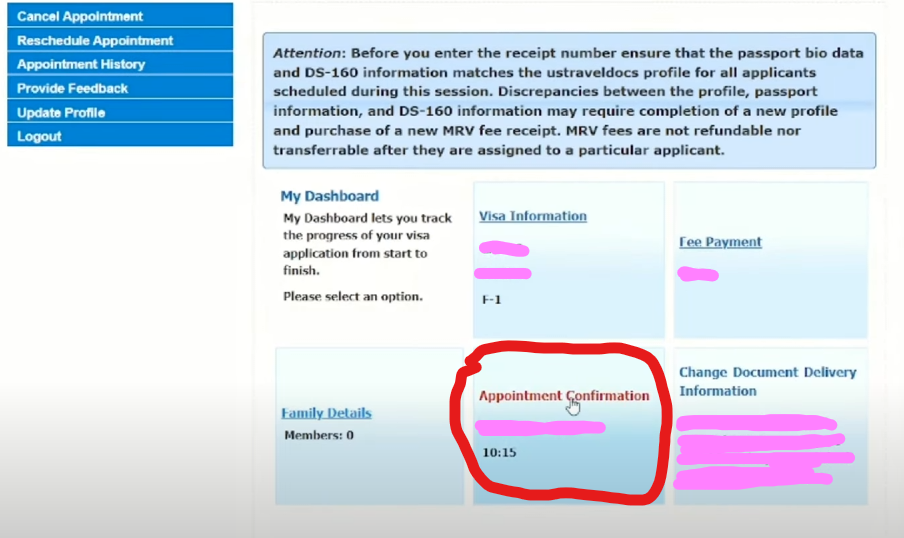
Now, everything is done; it’s time to download the appointment letter.
Log in to the portal, and on the homepage, click on “Appointment Confirmation.”
After that, a page will appear, and you can download it or send it to your email (make sure to check the spam folder as well).
That’s it! Now you are all ready for the interview. Good Luck!
If you don’t know what documents to take for the US interview, check this: “Documents Required for F1 Student Visa Interview.“
FAQs
Q: What documents do I need to book my F-1 visa interview?
A: You will need your passport, I-20 form, and a completed DS-160 form before scheduling your appointment.
Q: How do I pay the visa interview fee?
A: You can pay the fee through cash payment at NIMB Bank or via Connect IPS.
Q: Is the MRV fee refundable?
A: No, the MRV fee is non-refundable. If you need to reapply or schedule another interview, you will have to pay the fee again.
Q: Can I reschedule my appointment after booking?
A: Yes, you can reschedule your appointment up to four times after your initial booking.

 from Nepal")


1 thought on “How To Book US Student Visa Interview in Nepal”
Comments are closed.