Facebook is an essential social media platform where your profile name represents your identity. Whether you’ve changed your name legally, want to add a middle name, or need to adjust your display name, Facebook allows you to make these changes. However, there are certain restrictions and guidelines to follow, especially once your identity has been confirmed on the platform. This article will guide you through the steps to change your Facebook name on iOS/Android and through the website in Nepal.
Why is Your Facebook Name Important?
Your Facebook name is one of the primary identifiers people use to find you on the platform. Whether you’re connecting with friends, colleagues, or even using Facebook for business, having the correct name is crucial. Facebook also has strict policies to prevent the use of fake names or impersonation, which is why it’s important to ensure your name reflects your real identity. Keep in mind, that once you’ve verified your identity, name changes become more difficult, so choose wisely.
How to Change Facebook Name on iOS/Android
Here’s how you can easily change your name on Facebook using your mobile device:
- Open Facebook App:
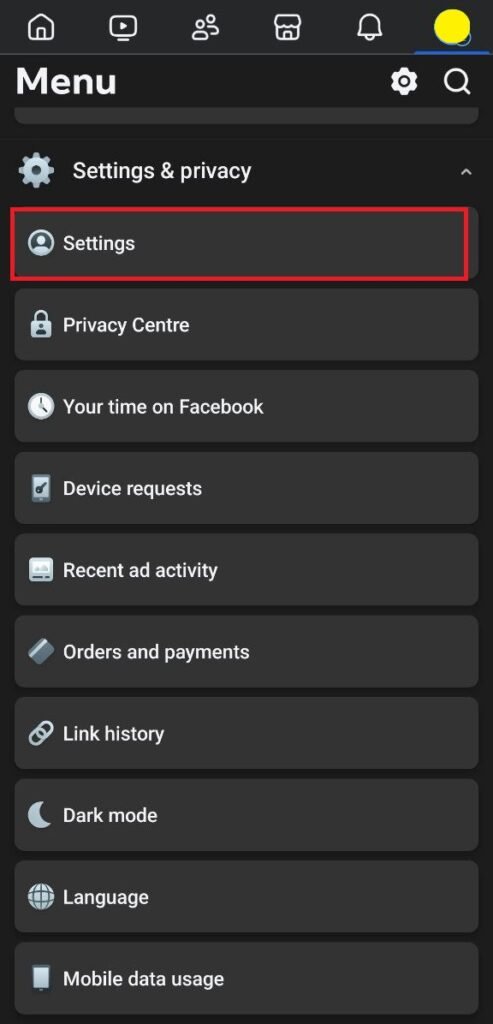
Launch your Facebook app and tap on your profile icon in the bottom-right corner. - Go to Settings & Privacy:
Scroll down and click on “Settings and Privacy,” then select “Settings.”

3. Select Profiles:
In the settings menu, find and click on “Profiles.”

4. Choose Your Profile:
If you have multiple accounts connected to Facebook, you will see all of them listed here. Select the account where you want to make the name change.

5. Click on ‘Name’:
Click on the “Name” section to make changes to your first and last name.

6. Edit Your Name:
Enter the new first name and last name. If your identity has already been confirmed on Facebook, you won’t be able to make further name changes.

7. Save Changes:
Once done, save the changes, and your Facebook name will be updated.
Check out “How to Change Facebook Password“
How to Change Facebook Name Through the Website
If you prefer using a computer or laptop, follow these steps to change your name on Facebook:
- Go to Facebook.com:
Visit the official Facebook website and click on your profile picture located at the top-right corner. - Navigate to Settings & Privacy:
Click on “Settings and Privacy,” then select “Settings.”


3. Click on Accounts Center:
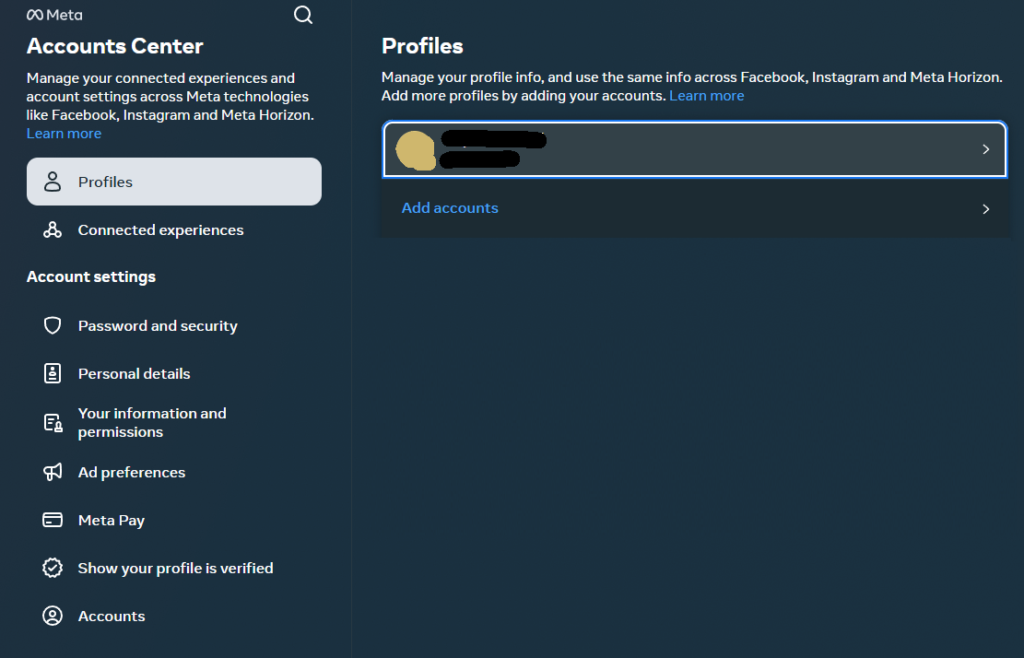
In the settings menu, click on the “Accounts Center” option.

4. Choose Profiles:
On the first tab, you’ll find the “Profiles” option. Click on it, and if you have multiple accounts connected, select the profile you want to update.

5. Edit Name:
Select the account you want to change the name for, click on “Name,” and enter your desired first and last name.


6. Confirm Changes:
If your identity is already confirmed on Facebook, you won’t be able to change your name further. Save the changes, and your Facebook name will be updated.
Important Notes:
- Name Change Restrictions:
If you have already confirmed your identity with Facebook, your ability to change your name may be restricted. Facebook enforces this rule to prevent people from misusing the platform. - Review Period:
Facebook typically takes a few days to review and approve name changes. Make sure the name you input meets Facebook’s guidelines, which prohibit symbols, numbers, unusual capitalization, and offensive words. - Frequent Changes:
You are not allowed to change your name frequently. Facebook may limit you to one name change every 60 days.
Why Is Your Password Important in This Process?
While the process of changing your name doesn’t directly involve your Facebook password, it’s always a good practice to ensure your account is secure, especially when making important changes. Regularly updating your password and keeping it strong can help protect your account from unauthorized access.
Conclusion
Changing your Facebook name is a straightforward process on both mobile and web platforms. Just follow the steps outlined above to update your name and ensure it accurately represents your identity. Remember that Facebook may limit name changes, especially after identity verification, so make sure to choose a name you are comfortable with.
FAQ:
Q1: How often can I change my Facebook name?
You can change your Facebook name once every 60 days. However, if you’ve already verified your identity, you might not be able to change your name again.
Q2: Why is Facebook not allowing me to change my name?
If you have already confirmed your identity on Facebook, or if it’s been less than 60 days since your last name change, Facebook may not allow further changes.
Q3: Can I use symbols or numbers in my Facebook name?
No, Facebook prohibits the use of symbols, numbers, unusual capitalization, and offensive words in names.
Q4: How long does it take for Facebook to update my name?
Facebook usually reviews and approves name changes within a few days.
Q5: What happens if I forget my password during the name change process?
If you forget your password, use the “Forgotten Your Password” option to reset it before making any changes.


1 thought on “How to Change Facebook Name in Nepal”
Comments are closed.